In this lesson you play with sound and time.
 Tonguing
So far I’ve always encouraged you to trigger the notes by blowing on. Most brass players use the term “breath attack” (or “light touch”). But there is also another school: if you have taken lessons from a teacher with classical training in a brass instrument, you will probably have learned to use your tongue to trigger the tone. Tonguing works as follows: you first close the “valve” of your lips by pressing the tip of your tongue against the gap between the two rows of teeth; at the same time you increase the air pressure in your oral cavity (bottom illustration, left part). Then you explosively pull the tip of your tongue down; the accumulated air pressure shoots through the valve and immediately causes the lips to vibrate (right part of the graphic).
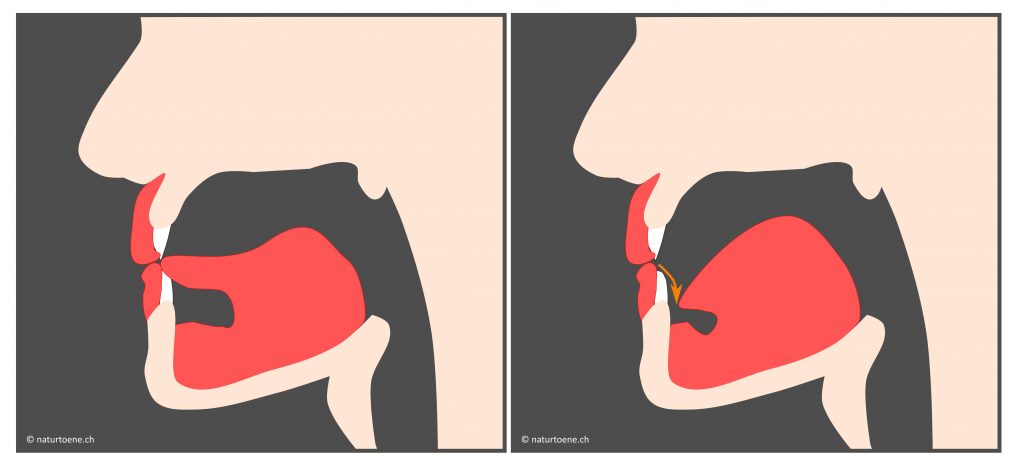
You’ve been practicing this tongue movement since early childhood, because it corresponds to the articulation of the syllable “tah” or “tey”. That’s why you immediately master tonguing by singing “tah” or “tey” into your alphorn.
When using your tongue this way, you are able to time the onset of the sound very precisely, because the tip of your tongue controls what is happening right at the center of action. When using breath attack, the impulse comes from the diaphragm and first has to find its way to the lips. Therefore, it makes a lot of sense that trumpeters and horn players, who play with maximum precision in orchestras, tend to use the tongue instead of blowing on. You will almost automatically use the tongue when playing fast with staccato or passages similar to a hunting horn.
But that has its price. In the brief moment when the tip of the tongue tigggers the tone by opening the valve, two suboptimal things happen: firstly, the air flow is confused – there is a bang; secondly, the tongue has not yet formed the air channel for the pitch, because it is busy pulling the tip of the tongue down (so something like the Heisenberg blur for alphorn players). If you watch the video from Lesson 4 again from about 0:53, you can see how the tongue slips into its position; in this small time window the sound is dirty.
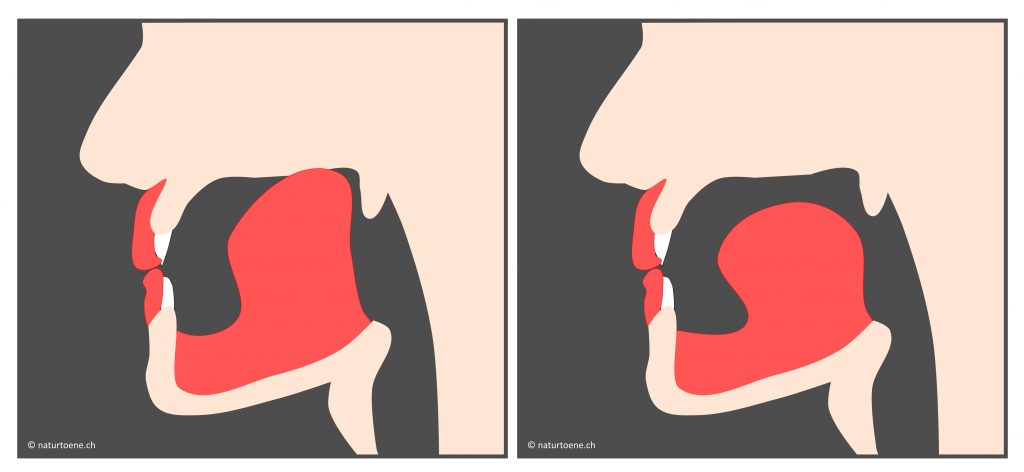
The topic of tonguing arises not only after a pause, but also between two closely following tones. Above a certain speed, you just can’t manage to blow on each note individually. You will intuitively use your tongue to help. However, in this situation, the main function of the tongue lies in the first part of the movement: it briefly interrupts the air flow and thus allows the lips to adapt to the new frequency more quickly. To soften the hard bang, you can make the lip movement more delicate (syllable “da”). Or even better: you push your tongue against the roof of your mouth (syllable “ga”). You can also observe this movement in the video from Lesson 4; here is the graphical representation:
Envelopes
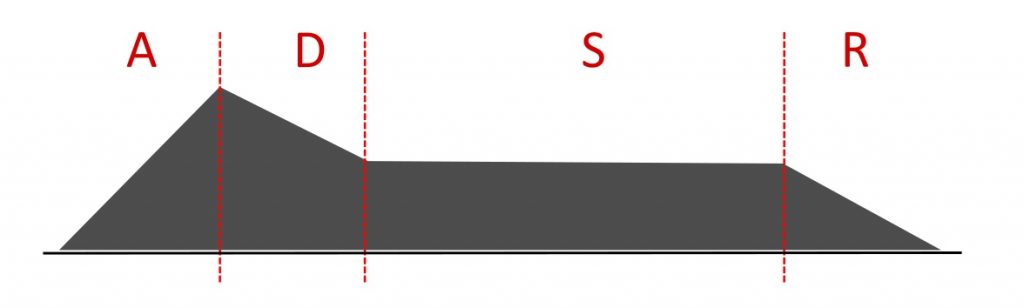
The articulation of your tones is the smallest unit of your interpretation. The more precisely you control them, the more differentiated your play will be. This is similar to a painter who must first master the technique of brushstrokes before attempting a large oil painting. There is a direct connection between fine motor implementation and sound. To refine your understanding of this, the concept of “envelope” (also “ADSR curve”) is useful. An envelope consists of four phases:
- A = Attack. The sound is triggered or swells (on keyboard instruments: key is pressed).
- D = Decay. The sound falls to its stable level.
- S = Sustain. The tone is sustained at its stabel level.
- R = Release. Sound disappears (you release the key).
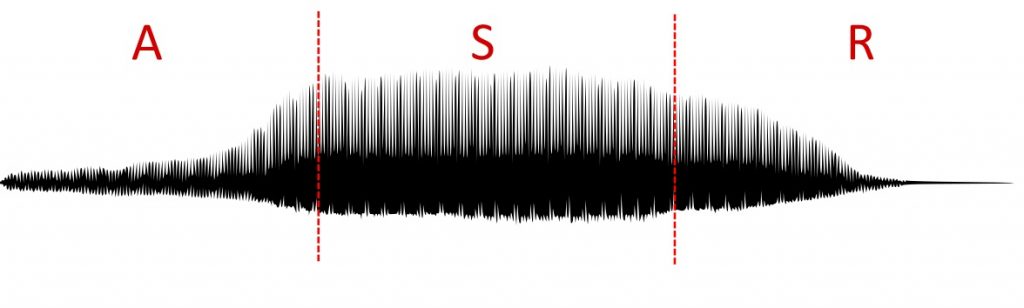
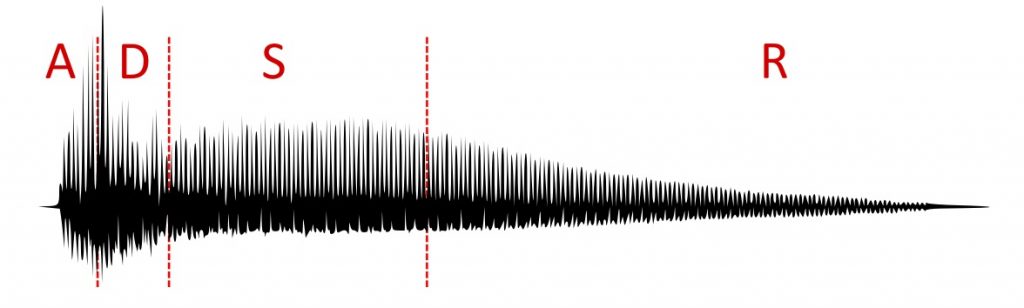
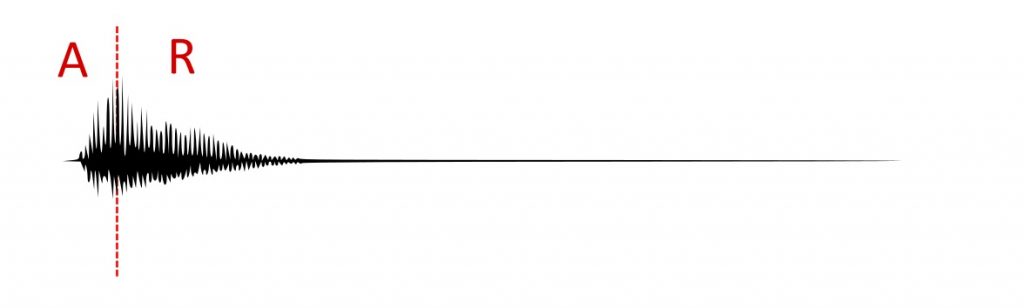
You can use this vocabulary when listening carefully to your tones. Below four articulations. A difference is immediately apparent in the A(ttack) phase: when you blow your note, it needs a certain amount of time to build up; the A runs very steeply. You see a second difference in the D(ecay) phase: there is no D when blowing, while it is clearly perceptible when tonguing. But it’s not just the evolution of loudness over time that differs: when you trigger a tone with your tongue, you always inevitably hear a smacking noise (the bang) and the sustained tone needs some time to stabilize afterwards. The tones played in this way have a different effect: Your playing sounds smoother and more lyrical (“alphorn-like”) when you blow on each tone. If you use the tip of your tongue to help, you sound more like a hunting horn. Of course there is also an intermediate area; depending on the intensity of the tonguing (“ta” or “da”), the A and D become steeper or flatter. Touching the palate instead of the teeth (“ga”) also affects the tone.
The vocabulary of envelopes is also useful for the rest of your tones’ life cycle. For example, a long S(ustain) with a short R(elease) sounds “confident”, while a short S with a long R makes a “dreamy” impression.
The hesitant articulation is almost always problematic. Beginners who have doubts about their accuracy tend to play each note softly at first in order to be able to correct it if necessary. The result – one speaks of “pushing” or the “wah-wah-effect”- just sounds bad. So try to break the habit of hesitant blowing a.s.a.p. If you’re afraid of wrong notes, here’s my advice: Give yourself a budget for wrong notes, e.g. one note out of ten can be wrong. Instead of getting angry about every wrong note, you can be happy if the budget is not used up

 Ariculation practice
Objective: You experience the effect of your articulation.
You can use any exercise from the Workout for Alphorn and Büchel, e.g. #15:

Play the exercise with different articulations. Play very slowly and listen carefully to the four phases (A,D,S,R). You can also visualize your sounds for support – e.g. with an audio recorder on your mobile phone or with this online recorder. Experiment with different versions; play through each version several times until you have mastered the appropriate articulation.
- Blow on: e.g. short A, S of equal length for all quavers with a short R; or short S with long R.
- Tonguing: try extremes – distinctive A with strong D; or tonguing with a barely perceptible D.
- Refining classical articulations: what happens with staccato or marcato?
- Exaggerations: e.g. extremely short R, blow on with a very long A, …
- Experimenting with alternative A&R: lips (“ba”), palate (“ga”), vocal-chord choking (“nghhh”).
- Then try to use the forms of articulation you have trained in this way when learning new pieces
Rubato
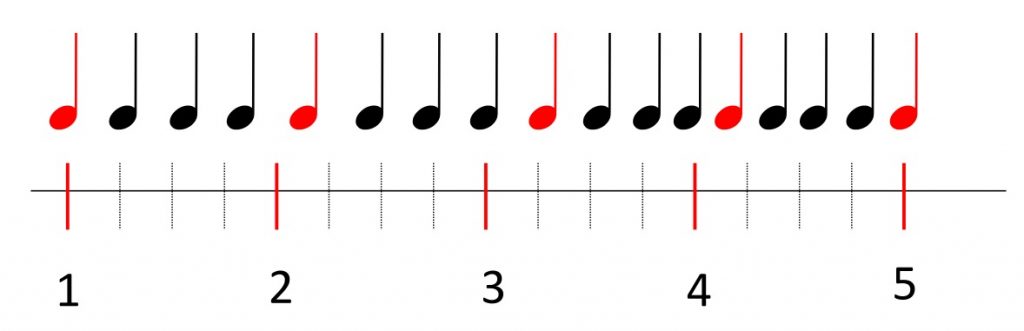
Rubato is a Romantic interpretation technique primarily associated with the piano music of Chopin and Schubert. “Rubato” means “stolen” in Italian. What is meant is the time that you can take (steal) but always have to give back. The graphic below shows the ideal. In the lower section you can see the fixed time scale of a metronome, above the played notes. If you play strictly in time (“linear”), the notes will match the metronome beats exactly. Here, someone playing “too slowly” at first, falling behind by more than one beat within two bars; but then there is an acceleration, and after four bars the musician is back in meter – that’s when the next cycle begins.
The term rubato has often been used for agogics since the late 19th century. Agogics generally means a change in tempo during the performance – and is an evaluation criterion of the Federal Yodelling Association. But rubato is more specific: the stolen time has to be returned in a larger cycle. The variation in speed is not arbitrary (not just any agogic), but follows a slow rhythm – the music “breathes”. Here is a demonstration by Robert Estrin how rubato gives the music a soul:
Experiment: Listen – e.g. on Spotify or on Youtube – different interpretations of Chopin’s Nocturne No. 2 to (Pollini, Rubinstein, Horowitz…); pay particular attention to the use and effect of the rubato. In case you are wondering what this has to do with the alphorn: Chopin wrote the Nocturnes in the first half of the 19th century, i.e. at the same time the “tradition” of the alphorn was invented. In order to understand “authentic” agogics, you cannot avoid Chopin.
What can you learn in this section as an alphorn player? First, the insight that tempo variations are a powerful element. Secondly, that agogic only works if it is not arbitrary. Tempo variations are not an end in themselves but an expression of a movement that takes place in addition to and in tension with the fixed meter. On the alphorn, this movement often corresponds to a slow “breathing cycle” based on the phrases.
![]() Further information
Further information
- The idea that tempo variations infuse life into the music is not limited to music from the Romantic period. It can be found in the form of groove and microtiming in jazz, funk and rock. In 1987, the anthropologist Charles Keil wrote that music is only touching and socially valuable when it deviates from meter (“Music, to be personally involving and socially valuable, must be ‘out of time’ and ‘out of tune’. “). This is not much different from Gassmann who demanded that the alphorn players should perform “not like a rhythmically stable village musician”. Here is an article on the current state of research.
Agogics Exercise
Objective: You develop an awareness of the effects of agogics.
You can explore agogics directly while studying new pieces. Try different tempo variations. If the score already contain instructions about the interpretation, take this as a starting point, i.e. try to implement the specifications exactly as demanded by the composer. Then experiment: exaggerate, do the opposite, or try completely different tempo variations. Always listen carefully to the music: how does the perception of the piece change between the variants? Which version goes best with the piece?
To practice rubato specifically, you can work with simple patterns like this one:

Accelerate on the first bar and slow down on the second so that you’re back in meter on the first beat of the third bar; continue analogously in the third and fourth bar. Play with and without metronome. Reverse the rubato pattern (first slow down, then speed up) and apply rubato over the longer four-bar phrase. Observe how the effect of the rubato changes.
Improvisation
Objective: Experiment freely with a wide variety of expressive elements.
Free improvisation is a great way to explore the effects of different forms of expression. Improvising together is a lot of fun – be it with other alphorn players, rhythm instruments or singers. Alone it’s sometimes a bit difficult – the silence can feel like the blank sheet in front of the poet. Here are a few ideas to get you started.
- Preliminary remark: The problem is usually not the lack of ideas, but reluctance to engage in seemingly trivial ideas. Play without restraint!
- Play with the whole palette! Improvising is not just about tone sequences, but about the interaction of tones, rhythm, dynamics, tone color, tempo, ….
- But also: Restrictions have a liberating effect. It is helpful to give the improvisation a stable framework. For example, this can be a strong rhythm, a melodic motif, a dynamic pattern, or a reduced selection of tones.
- Existing pieces are a good starting point. First play the piece or part of it, then you take an element and continue spinning it. Or you add more and more variations to the original piece.
- If you accidentally produce a strange sequence of notes, repeat it a second or third time. Repeats legitimize! And the weirder the material, the more interesting ideas can arise from it.
- If you can’t find any other players, use a canned accompaniment. For example, recordings of rhythms are well suited for developing your ideas (here an example with Djembe).
- Experiment with technical aids. Loop stations (e.g. this one by Boss) are particularly well suited; they allow you to record and combine several voices (here an example for alphorn with looper). Drum computers or groove boxes (available as inexpensive apps for mobile phones) spice up your improvisations. I also like to improvise to an electronic version of an Indian tanpura (here the link to the producer website).
- Record or film yourself. So you can continue tinkering with an idea another day.
- Improvise outside – the sound of the mountains is a great inspiration for free play.
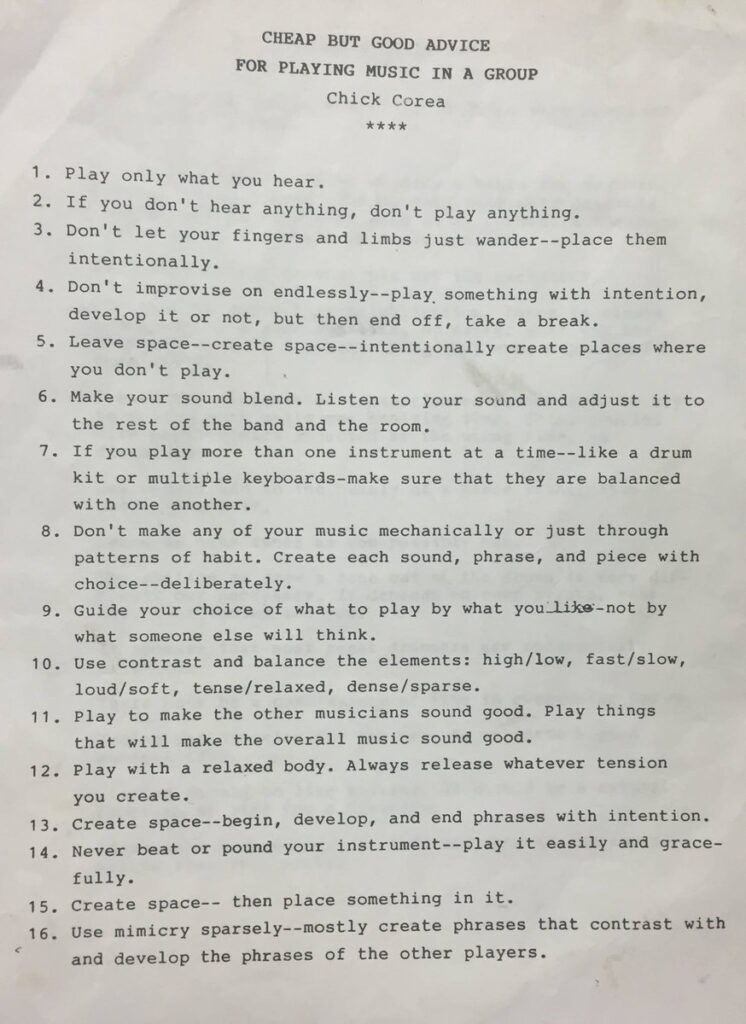
If you like to improvise when playing in a group, have a look at the famous cheap but good advise by Chick Corea:
 The Sound of The Alps
Already in 1938, alphorn pope Alfred Leonz Gassmann proclaimed in the first sentence of his Ten Commandments: “The alphorn belongs in the mountains!” (more on this in Lesson 10). He also points out what is important to him, namely the “long-distance effect” and the echo. This combination of alphorn and echo is firmly anchored in the Swiss collective subconscious. Emblematic of this is the vita of Alois Bucher, who searched for the perfect echo with büchel and alphorn – and was thus two decades ahead of today’s Artistic Research. The echo is so present in the aesthetics of the alphorn that it is part of the composition in many pieces. As an example, here is the last line of music from Gassmann’s “Am Vierwaldstättersee” with two echoes at the end.

Playing the alphorn in places with a clear echo is a powerful experience. Of course there are many such places in the mountains. The Echotopos project led by Christian Zehnder records echo locations in Switzerland on an interactive map. In the US, the Sierra Alphorn Players have compiled a similar Traveler’s Guide to Alpine Alphorn Locations near Reno. The best thing to do is to search for it yourself with your instrument. You will not find the clearest echo on the mountain peaks, but in valley basins, on mountain lakes and across from steep rock faces. There are also exciting acoustics outside the alpine environment: in the forest, in the multi-storey car park, in the water reservoir, in dam walls and under bridges. My personal favorite place is the anchor bay Krušćica on the island of Cres in Croatia.
Technically affine alphorn players can also take the echo home with them. As a pioneer, Res Margot experimented with electronic delays back in the 1990s. It’s not a big deal today: all you need is a microphone, some hardware and software (the key word is “convolution reverb“), and an amplifier system. Especially in winter I like to play freely in my practice room to the simulated echoes and travel to nuclear power plants, stalactite caves and the Taj Mahal with my eyes closed. On Ashley Aitken’s online reverb simulator you can also try it out with your laptop or mobile phone without any complex setup – the website simulates the echo of a huge underground oil tank in Scotland.
No one has yet been able to explain to me exactly why the magic of the echo casts a spell over us. After all, music research has found evidence that reverberation increases the intensity of subjective music perception and can lead to emotionally overwhelming listening experiences – that’s why reverberation is a central component of “Deep Listening“. The fact that the echo is particularly effective with the alphorn may have something to do with the merging of the overtones. But maybe it’s also the silence between the notes that we perceive more consciously thanks to the echo.
![]() Further information
Further information
- If you want to produce echoes electronically at home, you have two options: via computer or via loop station. Either way, you’ll need a decent mic (at least an inexpensive vocal mic like the Shure SM58), amp, and speakers. If you work with a computer, you also need an interface (e.g. the Focusrite Scarlett 2i2) and a DAW (Digital Audio Workstation, i.e. software) with a reverb plugin. If you use your stereo system as an amplifier and an open source DAW, you can start from 300 CHF; if you work with software like Ableton Live, add at least 500 CHF. For the production of echoes alone, that’s a steep price; however, such a music production setup opens up countless other possibilities. A loop station is simpler and more portable, but more limited in function and not primarily geared towards echoes (you probably just have simple “delay”, “reverb”, “chorus” and/or “reverb” effects). Still, as mentioned above, loop stations are great fun!